Payments
Configure how customers pay for their orders. BoxCart supports Stripe card payments, cash on collection, and manual bank transfers.
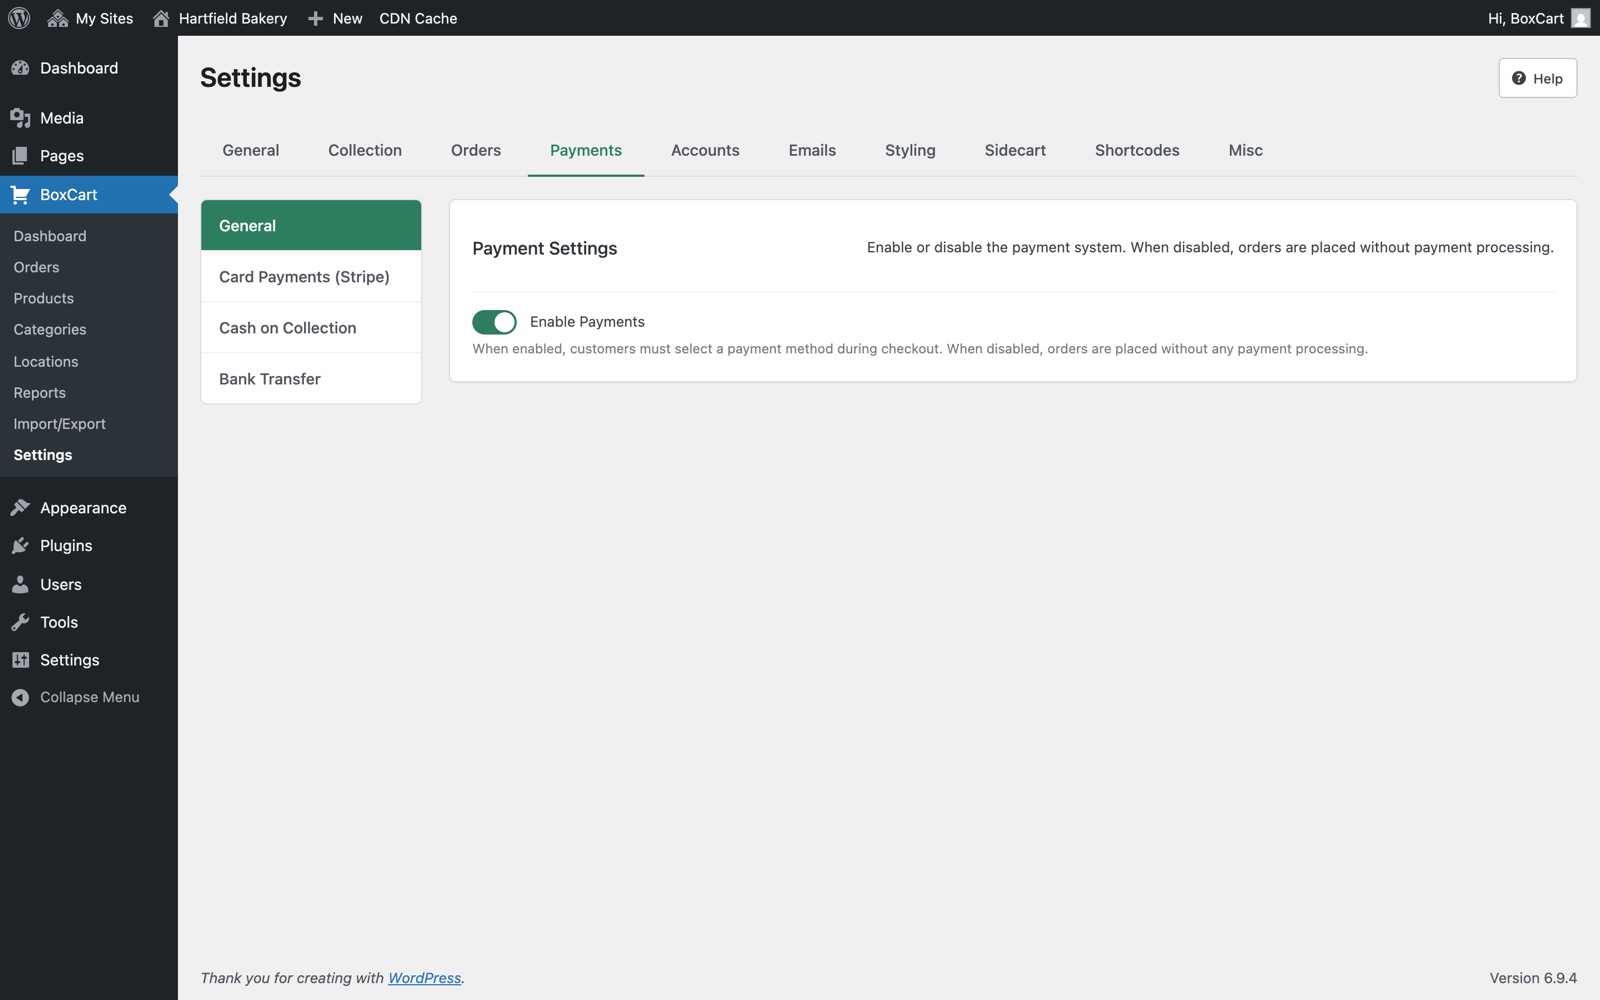
Payment Overview
All payment functionality in BoxCart is controlled by a master toggle. Navigate to BoxCart → Settings → Payments to access the payment configuration panel.
The Enable Payments toggle (payments_enabled) acts as the master switch for the entire payment system. When turned off, the payment system is completely dormant and customers will not be prompted to pay during checkout.
Once enabled, BoxCart offers three payment methods:
- Card Payments (Stripe) — Accept credit and debit cards via Stripe, with optional support for digital wallets and alternative payment methods
- Cash on Collection — Customers pay in person when they pick up their order
- Bank Transfer — Customers transfer funds manually to your bank account before collection
You can enable any combination of these methods. Each method appears as a selectable option at checkout when enabled.
Stripe Setup
Stripe provides secure card payment processing without requiring a PHP SDK. BoxCart communicates directly with Stripe's REST API using WordPress HTTP functions and uses the modern Stripe Payment Element on the frontend.
-
Enable Stripe
In BoxCart → Settings → Payments, first enable the master payments toggle, then turn on Enable Card Payments (Stripe). This reveals the Stripe configuration fields.
-
Choose test or live mode
The Test Mode toggle (
stripe_test_mode) defaults to on. When test mode is active, BoxCart uses your test API keys. Switch to live mode only after you have verified your integration works correctly. -
Enter your API keys
Depending on which mode you selected, enter the corresponding keys from your Stripe Dashboard:
- Publishable Key — Starts with
pk_test_orpk_live_. Used on the frontend to initialise the Payment Element. - Secret Key — Starts with
sk_test_orsk_live_. Used server-side to create PaymentIntents and verify webhooks.
- Publishable Key — Starts with
-
Configure the webhook
Copy the webhook URL displayed in your settings and add it as an endpoint in the Stripe Dashboard → Webhooks section:
/wp-json/boxcart/v1/webhook/stripeThe full URL will be your site domain followed by this path, for example:
https://yoursite.com/wp-json/boxcart/v1/webhook/stripeAfter creating the webhook endpoint in Stripe, copy the Signing Secret (starts with
whsec_) and paste it into the Webhook Secret field in BoxCart settings. -
Test the connection
Click the Test Connection button. BoxCart will verify your API keys are valid by making a test call to the Stripe API. A success or error message will be displayed immediately.
-
Set your currency
Select your currency from the Currency dropdown (
currency_code). Your store currency, also used for Stripe charges. Default:GBP. Options available:- GBP — British Pound Sterling
- USD — US Dollar
- EUR — Euro
Your Stripe Secret Key and Webhook Secret should never be shared publicly or committed to version control. BoxCart stores these as password-type fields in the admin, and they are only used server-side. The publishable key is the only key exposed to the frontend.
Additional Payment Types
When Stripe is enabled, card payments are always available. You can optionally enable additional payment methods through the Accepted Payment Types setting (stripe_payment_types):
| Payment Type | Control Method | Notes |
|---|---|---|
| Card Payments | Always enabled | Cannot be disabled when Stripe is active |
| Apple Pay | Wallet option | Requires domain verification in the Stripe Dashboard |
| Google Pay | Wallet option | No additional setup needed beyond enabling |
| Link | Wallet option | Stripe's one-click checkout experience |
| Klarna | PaymentIntent type | Buy now, pay later option |
| PayPal | PaymentIntent type | Processed through Stripe's PayPal integration |
| Afterpay/Clearpay | PaymentIntent type | Buy now, pay later option |
These payment types fall into three categories:
- Card payments are always enabled and cannot be disabled when Stripe is active.
- Apple Pay and Google Pay are wallet options that appear automatically when the customer's browser or device supports them. They are controlled via the Stripe Payment Element's
walletsoption on the frontend. - Link, Klarna, PayPal, and Afterpay/Clearpay are additional payment method types that can be individually enabled. They are controlled via the
payment_method_types[]parameter on the PaymentIntent created server-side.
All optional types are disabled by default.
Apple Pay requires you to verify your domain in the Stripe Dashboard. Google Pay does not require any additional configuration beyond enabling it in BoxCart.
Cash on Collection
Cash on collection is the simplest payment method to configure. It allows customers to pay in person when they pick up their order.
| Setting | Key | Description |
|---|---|---|
| Enable Cash on Collection | cash_on_collection_enabled | Toggle to make this method available at checkout. Defaults to on. |
| Customer Instructions | cash_on_collection_instructions | Custom text displayed at checkout and in the order confirmation email. |
The default instruction text is: "Please bring payment when you collect your order." You can customise this to include any relevant details such as accepted denominations or exact change requirements.
When a customer selects cash on collection, the order is created with payment_status = 'pending'. The admin can then update the payment status when the customer pays at pickup.
Bank Transfer
Bank transfer allows customers to pay by transferring funds directly to your bank account. This is a manual process where the admin confirms payment once the transfer is received.
| Setting | Key | Description |
|---|---|---|
| Enable Bank Transfer | bank_transfer_enabled | Toggle to make this method available at checkout. Defaults to off. |
| Customer Instructions | bank_transfer_instructions | Instructions displayed to the customer explaining how to pay. |
| Account Name | bank_transfer_account_name | The name on your bank account. |
| Sort Code | bank_transfer_sort_code | Your bank sort code (placeholder format: 00-00-00). |
| Account Number | bank_transfer_account_number | Your bank account number. |
The default instruction text is: "Please transfer the order total to the bank account below. Your order will be confirmed once payment is received."
Payment status flow
Bank transfer orders follow a specific payment lifecycle:
-
Order placed
The order is created with
payment_status = 'awaiting_payment'. The confirmation page and confirmation email both display your bank account details (account name, sort code, account number) along with the order reference. -
Customer transfers funds
The customer makes a manual bank transfer using the details provided. They should use their order number as the payment reference.
-
Admin confirms payment
When the transfer appears in your bank account, navigate to the order in BoxCart → Orders and click the Confirm Payment Received button. This sets
payment_status = 'paid'and advances the order to'processing'. -
Customer notified
A "Payment Received" email is automatically sent to the customer confirming their payment has been processed.
Testing with Stripe
Before going live, thoroughly test your Stripe integration using test mode. Ensure the Test Mode toggle is enabled and that you have entered your test API keys (prefixed with pk_test_ and sk_test_).
Test card numbers
Stripe provides test card numbers that simulate different payment outcomes. Use any future expiry date and any three-digit CVC:
| Card Number | Result |
|---|---|
4242 4242 4242 4242 | Successful payment |
4000 0000 0000 0002 | Card declined |
4000 0000 0000 9995 | Insufficient funds |
4000 0025 0000 3155 | Requires 3D Secure authentication |
Always complete end-to-end testing by placing a full test order through checkout. Verify that the order appears in BoxCart → Orders, the payment status updates correctly, and both the customer confirmation and admin notification emails are sent.
Webhook testing
To test webhooks locally during development, you can use the Stripe CLI to forward webhook events to your local environment:
stripe listen --forward-to https://yoursite.local/wp-json/boxcart/v1/webhook/stripeThe CLI will provide a temporary webhook signing secret (starting with whsec_) that you should enter in your BoxCart webhook secret field while testing.
Stripe Webhooks
BoxCart registers a REST API endpoint to receive real-time payment notifications from Stripe:
POST /wp-json/boxcart/v1/webhook/stripeThis endpoint is handled by BoxCart_Stripe::handle_webhook() and provides a backup payment confirmation mechanism alongside the synchronous PaymentIntent status check that runs on the checkout redirect.
Setting up webhooks in Stripe
-
Add the endpoint
In the Stripe Dashboard → Webhooks, click Add endpoint. Enter your full webhook URL (e.g.
https://yoursite.com/wp-json/boxcart/v1/webhook/stripe). -
Select events
Subscribe to the following events:
payment_intent.succeeded— Fired when a payment is successfully completedpayment_intent.payment_failed— Fired when a payment attempt fails
-
Copy the signing secret
After creating the endpoint, Stripe reveals a Signing Secret (starting with
whsec_). Copy this value and paste it into the Webhook Secret field in BoxCart → Settings → Payments.
Signature verification
Every incoming webhook request is verified using HMAC-SHA256 signature verification against your webhook secret. This ensures that only genuine requests from Stripe are processed. If verification fails, the request is rejected and no order updates are made.
Dual confirmation
BoxCart uses a dual confirmation approach for Stripe payments:
- Synchronous check — When the customer is redirected back from Stripe, the confirmation page checks the PaymentIntent status directly. If
succeeded, the order's payment status is set to'paid'. Ifrequires_payment_method, it is set to'failed'. - Webhook backup — The
payment_intent.succeededwebhook fires independently as a backup, ensuring the order status is updated even if the redirect check fails.
Without a valid webhook secret, BoxCart cannot verify incoming webhook requests. This means Stripe payment status updates may not be applied reliably. Always configure the webhook secret after setting up your endpoint in the Stripe Dashboard.
Troubleshooting
If you encounter issues with payments, check the following common problems:
API keys are in the wrong mode
Make sure your key prefixes match the mode you are using. Test keys start with pk_test_ and sk_test_, while live keys start with pk_live_ and sk_live_. If test mode is enabled in BoxCart but you have entered live keys (or vice versa), payments will fail. BoxCart shows the appropriate key fields based on the test mode toggle.
Webhook endpoint not configured
If payment statuses are not updating after checkout, verify that your webhook endpoint is correctly configured in the Stripe Dashboard. The endpoint URL must match your site exactly:
https://yoursite.com/wp-json/boxcart/v1/webhook/stripeAlso confirm that the endpoint is subscribed to the payment_intent.succeeded and payment_intent.payment_failed events.
Webhook secret missing or incorrect
If webhook requests are being rejected, the signing secret in BoxCart may not match the one from your Stripe endpoint. Navigate to your webhook endpoint in the Stripe Dashboard, reveal the signing secret, and ensure it matches the value in BoxCart → Settings → Payments → Webhook Secret. The secret starts with whsec_.
Connection test failing
The Test Connection button verifies your API keys by making a test call to the Stripe API. If this fails:
- Confirm you have copied the full key without extra spaces
- Check that the key prefix matches the selected mode (test or live)
- Verify your server can make outbound HTTPS requests to
api.stripe.com - Check that your Stripe account is active and not restricted
Stripe Payment Element not loading
If the card payment form does not appear at checkout:
- Verify the publishable key is entered correctly
- Check the browser console for JavaScript errors
- Ensure HTTPS is enabled on your site (Stripe requires a secure connection)
- Confirm that the master payments toggle and Stripe toggle are both enabled
Orders stuck in "awaiting_payment"
For bank transfer orders, this status is expected until the admin manually confirms payment. Navigate to the order in BoxCart → Orders and click Confirm Payment Received once you have verified the bank transfer in your account.
BoxCart creates orders before payment is confirmed (order-first flow). If a Stripe payment fails, the order will still exist in your system with payment_status = 'failed'. This is by design, allowing you to follow up with customers about failed payments.